Dozvolite mi da vam predstavim brz način kako da povežete Windows server sa Ansible-om koji funkcioniše na Ubuntu sistemu.
Da biste pratili korake opisane u nastavku, neophodno je da na oba sistema imate instaliran Python 3.x i Ansible. Ukoliko vam je potrebna pomoć, možete pogledati sledeće članke:
Kako instalirati i podesiti Ansible na Ubuntu?
Kako instalirati Ansible na Windows?
Ispod se nalaze detalji servera koje ja koristim:
- Ansible kontroler – 192.168.0.108
- Windows Server – 192.168.0.102
Korak 1: Kreiranje Ansible Windows korisnika
Napravite novog korisnika za konfigurisanje Ansible Windows konekcije.
- Otvorite „Upravljanje računarom“ na vašem Windows sistemu i navigirajte do „Lokalni korisnici i grupe“.
- Kliknite desnim tasterom miša na „Korisnici“ i kreirajte novog korisnika.
- Označite opciju „Lozinka nikada ne ističe“ i kliknite „Kreiraj“.
- Među dostupnim grupama, kliknite desnim tasterom miša na grupu „Administratori“ i izaberite „Svojstva“.
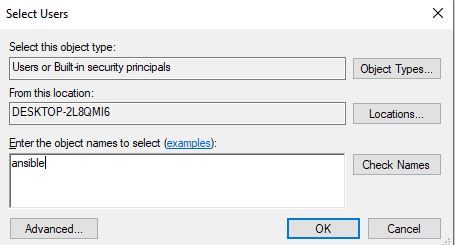
- Kliknite „Dodaj“ i unesite „ansible“ u polje za nazive objekata.
- Kliknite „Proveri imena“, a zatim „OK“.
Sada je ansible korisnik na Windows mašini spreman za upotrebu.
Korak 2: Konfigurisanje biblioteka i WinRM
Na vašem Ansible kontroleru, ažurirajte sistem i instalirajte biblioteke koje su navedene u nastavku.
[email protected]:~$ sudo apt-get update
[email protected]:~$ sudo apt-get install gcc python-dev
[email protected]:~$ sudo apt install python3-pip
WinRM, skraćeno od Windows Remote Management, omogućava vam da izvršavate zadatke administracije na udaljenim Windows sistemima. Instaliraćemo python3-winrm, python klijent koji služi za povezivanje sa Windows sistemom.
[email protected]:~$ sudo apt-get install python3-winrm
Reading package lists... Done
Building dependency tree
Reading state information... Done
The following packages were automatically installed and are no longer required:
gyp libc-ares2 libhttp-parser2.8 libjs-async libjs-inherits libjs-is-typedarray libjs-node-uuid libuv1 libuv1-dev node-abbrev node-ajv
node-ansi node-ansi-color-table node-ansi-regex node-ansi-styles node-ansistyles node-aproba node-archy node-are-we-there-yet node-async

node-validate-npm-package-license node-wcwidth.js node-which node-which-module node-wide-align node-wrap-ansi node-wrappy node-y18n
node-yallist node-yargs node-yargs-parser nodejs nodejs-doc
Use 'sudo apt autoremove' to remove them.
The following additional packages will be installed:
python3-kerberos python3-ntlm-auth python3-requests-kerberos python3-requests-ntlm python3-xmltodict
The following NEW packages will be installed:
python3-kerberos python3-ntlm-auth python3-requests-kerberos python3-requests-ntlm python3-winrm python3-xmltodict
0 upgraded, 6 newly installed, 0 to remove and 231 not upgraded.
Need to get 84.8 kB of archives.
After this operation, 442 kB of additional disk space will be used.
Do you want to continue? [Y/n] Y
Get:1 http://old-releases.ubuntu.com/ubuntu cosmic/universe amd64 python3-kerberos amd64 1.1.14-1build1 [16.8 kB]
Get:2 http://old-releases.ubuntu.com/ubuntu cosmic/universe amd64 python3-ntlm-auth all 1.1.0-1 [19.6 kB]
Get:3 http://old-releases.ubuntu.com/ubuntu cosmic/universe amd64 python3-requests-kerberos all 0.11.0-2 [10.1 kB]
Get:4 http://old-releases.ubuntu.com/ubuntu cosmic/universe amd64 python3-requests-ntlm all 1.1.0-1 [6,004 B]
Get:5 http://old-releases.ubuntu.com/ubuntu cosmic/universe amd64 python3-xmltodict all 0.11.0-2 [10.6 kB]
Get:6 http://old-releases.ubuntu.com/ubuntu cosmic/universe amd64 python3-winrm all 0.3.0-2 [21.7 kB]
Fetched 84.8 kB in 1s (70.3 kB/s)
Selecting previously unselected package python3-kerberos.
(Reading database ... 244430 files and directories currently installed.)
Preparing to unpack .../0-python3-kerberos_1.1.14-1build1_amd64.deb ...
Unpacking python3-kerberos (1.1.14-1build1) ...
Selecting previously unselected package python3-ntlm-auth.
Selecting previously unselected package python3-xmltodict.
Preparing to unpack .../4-python3-xmltodict_0.11.0-2_all.deb ...
Unpacking python3-xmltodict (0.11.0-2) ...
Selecting previously unselected package python3-winrm.
Preparing to unpack .../5-python3-winrm_0.3.0-2_all.deb ...
Unpacking python3-winrm (0.3.0-2) ...
Setting up python3-kerberos (1.1.14-1build1) ...
Setting up python3-winrm (0.3.0-2) ...
Korak 3: Ažuriranje Ansible inventar fajla
Sada ću izmeniti ansible hosts fajl dodavanjem IP adrese Windows sistema. Na taj način, Ansible će znati koji Windows sistem treba da poveže.
[email protected]:~$ sudo gedit /etc/ansible/hosts

[win]
192.168.0.102
Korak 4: Ažuriranje Ansible grupnih promenljivih
Kreirajte direktorijum za podešavanje promenljivih koje su potrebne za konekciju sa Windows sistemom.
[email protected]:~$ mkdir /etc/ansible/group_vars
[email protected]:~$ sudo chmod -R 777 /etc/ansible/
Napravite fajl win.yaml i dodajte podatke o korisniku kojeg ste kreirali u prvom koraku, kao i ostale varijable koje su neophodne za povezivanje sa Windows sistemom.
[email protected]:~$ gedit /etc/ansible/group_vars/win.yaml
---

ansible_user: ansible

ansible_password: ansible

ansible_connection: winrm

ansible_winrm_server_cert_validation: ignore

ansible_winrm_transport: basic

ansible_winrm_port: 5985

ansible_python_interpreter: C:Userstechblog.co.rsAppDataLocalProgramsPythonPython37python
Korak 5: Konfigurisanje Windows servera za upravljanje
Otvorite Windows PowerShell i izvršite nadogradnju. Potrebno je da imate PowerShell 3.0 i .NET Framework 4.0 instalirane na Windows mašini.
PS C:WINDOWSsystem32> $url = "https://raw.githubusercontent.com/jborean93/ansible-windows/master/scripts/Upgrade-PowerShell.ps1"
PS C:WINDOWSsystem32> $file = "$env:tempUpgrade-PowerShell.ps1"
PS C:WINDOWSsystem32> $username = "ansible"
PS C:WINDOWSsystem32> $password = "ansible"
PS C:WINDOWSsystem32> (New-Object -TypeName System.Net.WebClient).DownloadFile($url, $file)
PS C:WINDOWSsystem32> Set-ExecutionPolicy -ExecutionPolicy Unrestricted -Force
PS C:WINDOWSsystem32> &$file -Version 5.1 -Username $username -Password $password -Verbose
Za konfigurisanje WinRM na Windows sistemu pomoću Ansible-a, Ansible je obezbedio skriptu za daljinsku konfiguraciju. Pokrenite skriptu u PowerShell-u.
PS C:WINDOWSsystem32> $url = "https://raw.githubusercontent.com/ansible/ansible/devel/examples/scripts/ConfigureRemotingForAnsible.ps1"
PS C:WINDOWSsystem32> $file = "$env:tempConfigureRemotingForAnsible.ps1"
PS C:WINDOWSsystem32> (New-Object -TypeName System.Net.WebClient).DownloadFile($url, $file)
PS C:WINDOWSsystem32> powershell.exe -ExecutionPolicy ByPass -File $file
PS C:WINDOWSsystem32> winrm enumerate winrm/config/Listener

Listener
Address = *
Transport = HTTP
Port = 5985
Hostname
Enabled = true
URLPrefix = wsman

CertificateThumbprint
ListeningOn = 127.0.0.1, 169.254.8.240, 169.254.36.9, 169.254.102.217, 169.254.215.170, 192.168.0.102, ::1, fe80::3131:c6d7:9ef5:8f0%7, fe80::51b7:9134:550d:d7aa%22, fe80::88f1:1229:e1dd:2409%16, fe80::99cf:5796:4f8e:f5c1%15, fe80::fd77:c19d:e0f2:66d9%9

Listener
Address = *
Transport = HTTPS
Port = 5986
Hostname = DESKTOP-2L8QMI6
Enabled = true
URLPrefix = wsman

CertificateThumbprint = C83B3FC8B274D0B650F0FD647DC7AC129BBE3FA0
ListeningOn = 127.0.0.1, 169.254.8.240, 169.254.36.9, 169.254.102.217, 169.254.215.170, 192.168.0.102, ::1, fe80::3131:c6d7:9ef5:8f0%7, fe80::51b7:9134:550d:d7aa%22, fe80::88f1:1229:e1dd:2409%16, fe80::99cf:5796:4f8e:f5c1%15, fe80::fd77:c19d:e0f2:66d9%9
Podesite WinRM da dozvoli HTTP saobraćaj.
PS C:WINDOWSsystem32> winrm set winrm/config/service '@{AllowUnencrypted="true"}'
Service
    RootSDDL = O:NSG:BAD:P(A;;GA;;;BA)(A;;GR;;;IU)S:P(AU;FA;GA;;;WD)(AU;SA;GXGW;;;WD)

    MaxConcurrentOperations = 4294967295

    MaxConcurrentOperationsPerUser = 1500

    EnumerationTimeoutms = 240000
    MaxConnections = 300

    MaxPacketRetrievalTimeSeconds = 120
    AllowUnencrypted = true
    Auth
        Basic = true
        Kerberos = true
        Negotiate = true
        Certificate = false
        CredSSP = false

    CbtHardeningLevel = Relaxed
    DefaultPorts
        HTTP = 5985
        HTTPS = 5986
    IPv4Filter = *
    IPv6Filter = *

    EnableCompatibilityHttpListener = false

    EnableCompatibilityHttpsListener = false

    CertificateThumbprint
    AllowRemoteAccess = true
Podesite osnovnu autentifikaciju u WinRM-u.
PS C:WINDOWSsystem32> winrm set winrm/config/service/auth '@{Basic="true"}'
Auth
        Basic = true
        Kerberos = true
        Negotiate = true
        Certificate = false
        CredSSP = false
CbtHardeningLevel = Relaxed
Korak 6: Testiranje povezanosti sa Windows serverom
Svi koraci na mašini su sada završeni. Idite na Ansible kontroler i pingujte Windows server koristeći win_ping Ansible modul.
[email protected]:~$ ansible win -m win_ping
192.168.0.102 | SUCCESS => {

    "changed": false,
    "ping": "pong"
}
Poruka o uspehu ukazuje da je veza uspostavljena. Windows sistem je sada spreman za daljinsko upravljanje putem Ansible-a koji radi na Ubuntu-u.